Development Guide
Environment configuration
-
Open terminal and run
npm -v. Make sure that Nodejs is installed on your PC. If Nodejs is not installed on your PC Click here to download and install Nodejs. -
Open terminal and run
composer. Make sure that Composer is installed on your PC. If not installed Click here to download and install Composer.
How to install Locally-
-
Make sure you have met our server requirements.
- PHP Version == 8.0 or 8.1
- MySql Version >= 5.6+
- Maria DB Version >= 10.2+
- Node Version = 14.x to 16.x
- npm Version >= 6.12
- Composer
- Symlink/storage permission
-
Make sure that node.js and composer are installed in your local environment.
-
Now, download the zipped file from CodeCanyon.
-
Unzip the zipped file. Inside the unzipped folder you will get two folders "Documentation" and "upload"
-
Move all the items from the "upload" folder to local directory from where you want to run the application
-
Open the folder in the Editor (phpstorm, vscode etc.)
-
Go to src folder and open .env file: update
APP_INSTALLED=true -
Move the
src/webpack.mix.jsandsrc\package.jsonfiles one folder up (to the root). -
Update the
src/webpack.mix.jsfile as:const mix = require("laravel-mix"); /* |-------------------------------------------------------------------------- | Mix Asset Management |-------------------------------------------------------------------------- | | Mix provides a clean, fluent API for defining some Webpack build steps | for your Laravel application. By default, we are compiling the Sass | file for the application as well as bundling up all the JS files. | */ mix.setPublicPath("./") .setResourceRoot("../") // Turns assets paths in css relative to css file // .options({ // processCssUrls: false, // }) .sass("src/resources/sass/payslip.scss", "css/payslip.css") .sass("src/resources/sass/core/core.scss", "css/core.css") .sass("node_modules/dropzone/src/dropzone.scss", "css/dropzone.css") .sass("src/resources/sass/_global.scss", "css/fontawesome.css") .js("src/resources/js/mainApp.js", "js/core.js") .extract([ // Extract packages from node_modules to vendor.js "jquery", "bootstrap", "popper.js", "axios", "sweetalert2", "lodash" ]) if (mix.inProduction()) { mix.version().options({ // Optimize JS minification process terser: { cache: true, parallel: true, sourceMap: true } });} else { // Uses inline source-maps on development mix.webpackConfig({ devtool: "inline-source-map", }); } -
Replace line No. 11 and 12 of the
src\resources\sass\core\core.scssfile with these lines@import url("../../../../node_modules/nouislider/distribute/nouislider.min.css");@import url("../../../../node_modules/animate.css/animate.min.css");@import url('../../../../node_modules/mapbox-gl/dist/mapbox-gl.css');; - Open a terminal on the application root folder and run bellow commands
npm installnpm run devornpm run watch
-
Now navigate to
srcfolder in command line and run the below commands
composer installphp artisan storage:link
-
Create a local database from your local machine.
-
Update the database credentials in the .env file.
DB_CONNECTION=mysql
DB_HOST=127.0.0.1/localhost
DB_PORT=3306
DB_DATABASE=your_database_name
DB_USERNAME=your_database_user_name
DB_PASSWORD=your_database_password
-
After configure your database credentials. You have to run
php artisan optimize:clear
php artisan migrate:fresh --seed
-
If you want some demo data in the application, please run
php artisan db:demo
-
In this
srcfolder open another terminal and run the below command in order to complete all the queued jobs generated in the application
php artisan schedule:work
-
Run the below command on a terminal of the
rootdirectory of your application
php -S localhost:8000 -t ./
-
Then you will get a URL in terminal: ex (http://127.0.0.1:8000)
-
Copy and paste the url on a browser.
-
After that, your application should be ready to use locally.
Prepare local changes for server
-
Go to
srcfolder and open.envfile: updateAPP_INSTALLED=false -
Zip all project files without
node_modulesfolder. -
Upload this zip on the server and extract
-
N.B: If you change anything and we change or improve to that specific area you might not able
to get our future release. Because once you update then your changes will be gone.
Language Setting
- If you would like to change any language, please copy the text from default.php to custom.php.
- Please note, we may replace all other files except the custom.php in future updates.
- This video shows you the steps on how to add/translate language in the Application.
-
Set Settings
-
Go to "src/resources/lang" directory of the project.
-
Add a new directory named on your new language's code name. Like, for Spanish language your directory name would be es, for Portuguese pt etc.
For getting more language's code name you can go to "config/language.php" of the project. Here you can find all the possible language name and their code.
N:B: Make sure the directory name is same as the valid code of your language.
-
Copy all the files from "src/resources/lang/en" directory to your new language directory.
-
Change "src/resources/lang/your-new-language-name/default.php" file. Just make the changes to the right sided text in your language.
Suppose, you are adding a new language "Portuguese" in this app. So add a new directory named "pt" in "src/resources/lang".
Copy all files from "src/resources/lang/en" directory to "src/resources/lang/pt".
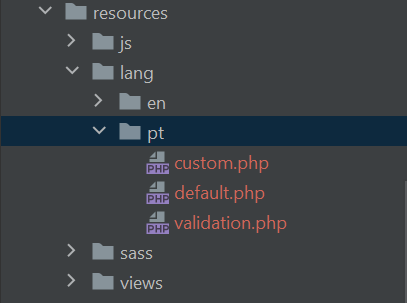
Then change the "default.php" file in this directory. Just make the changes to the right sided text in your selected language.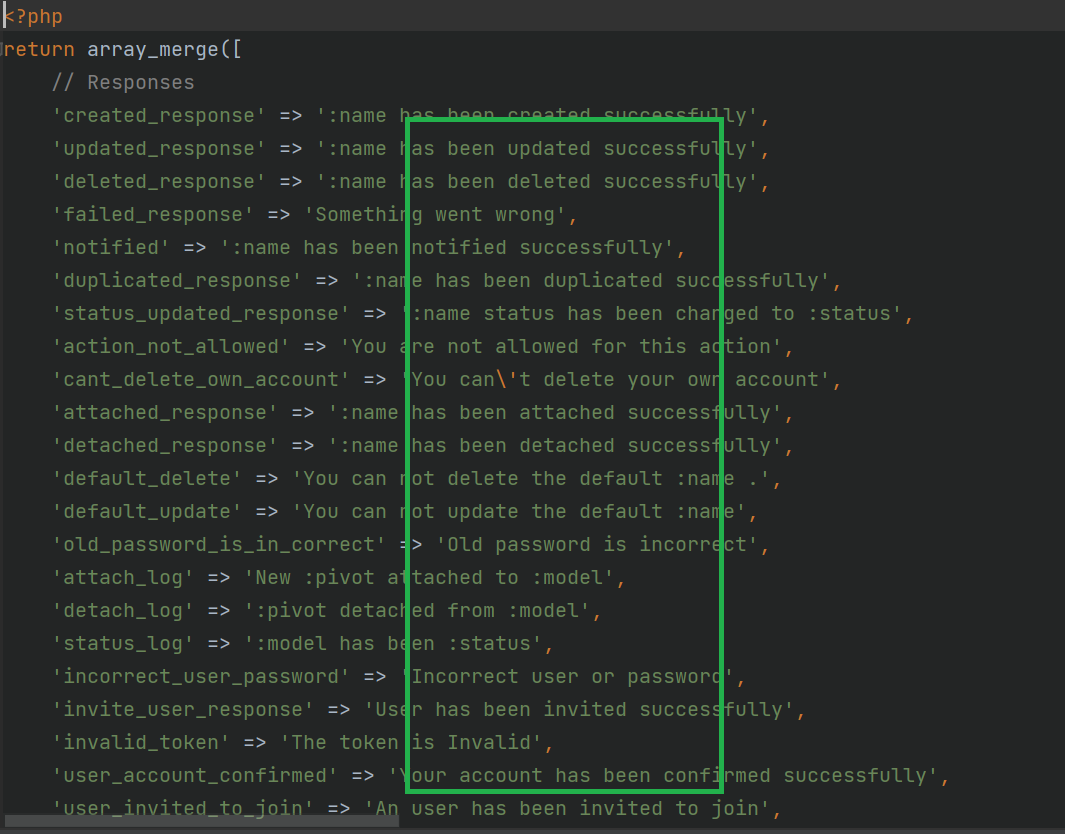
There can be translations from English (such as, "add"=>"Add"). You should change this to portuguese (such as, "add" => "Adicionar").
N:B: Do not change the word with clone(:) and curly bracket({}) like, :name or {name}. keep those word same and change the other word.
-
-
Update language
-
Go to "Settings">"Application Settings".
-
Select your preferred language from "Language Settings" section. Save the changes.
-
If you would like to change any language, please copy the text from default.php to custom.php.
-
Please note, we may replace all other files except the custom.php in future updates.
-
After changing any text, please remember to clear cache from the Settings > Application settings by login as admin.
-
Add New Page
-
Go to "src/resources/views/tenant/" directory of the project.
-
Create a directory and name it similar to your feature.
-
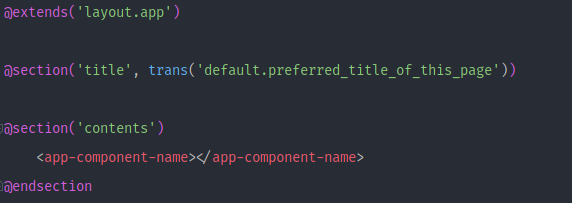
Add a new blade file with the following code. Make sure to change "default .preferred_title_of_this_page" to your page title which is added in default.php of your language file and change the "app-component-name" to your component name related to feature. (component create process described below) for app level use @extends('layout.app'), for brand level use@extends('layout.brand')
-
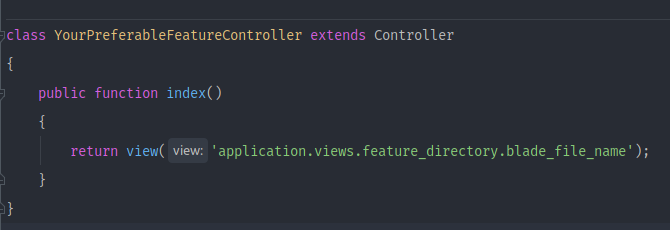
Go to "app/Http/Controllers/Tenant" make a directory similar to your feature name. Create a controller class like "YourFeatureNameController", which is extends "App\Http\Controllers\Controller". create a function that returns view of the page you created before. Like for example:
-
Go to "routes/" directory, check route files and subdirectories. You can create a .php file or you also can add in existing file which is similar to your feature. and create a route for your page like that-

-
After successfully installed node_modules, To change something in vue component you need to go through the following steps -
-
Go to "src/resources/js/tenant/Components/View" directory. make a directory related to your feature.
-
Add a new .vue file. Like for example-
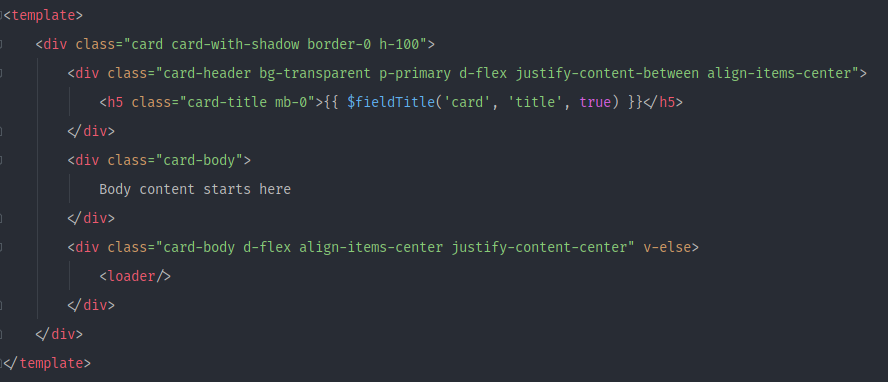
Write your desired HTML code inside the component.
-
Go to "src/resources/js/tenant/tenantComponent.js" file and register your vue component

Save your changes. Make sure that your component is compiling successfully.
-
Now hit your route in the browser and see the new page.
Change Color & Design
After installing the application locally you can modify and change any design by changing the
files from resources/sass folder.
Change Brand Color
- Install the app locally.
- Go to
resources/sass/core/_variables.scssfile. - On line
22you can see$brand-color: #019AFF; - Change the color code with your new color code.
- Build the css with
npm - And your application should appear with new brand color.
